
Regular inspection and prompt repair of common issues are crucial for maintaining historic slate roofs in Springfield, MA. Replace missing or damaged slates, underlayment, and flashing with high-quality materials that match the existing aesthetic. Follow a step-by-step guide to ensure historical integrity by closely matching colors and textures. Apply a protective sealant after restoration to enhance water resistance and extend the roof's lifespan, ensuring structural soundness and curb appeal.
“Restoring a slate roof not only extends its lifespan but also revitalizes your Springfield, MA property’s curb appeal. This comprehensive guide tackles the entire process, from assessing damage like cracked or missing tiles to preserving the original design through color and texture matching. Learn which materials are essential for effective repair and gain step-by-step instructions for a successful restoration. Finally, discover sealing and maintenance tips to ensure your restored slate roof endures for years to come.”
- Assessing Damage: Identifying Problems in Slate Roofs
- Materials Needed for Effective Repair and Restoration
- Step-by-Step Guide to Fixing a Damaged Slate Tile
- Preserving the Original Design: Color and Texture Considerations
- Final Touches: Sealing and Maintaining Your Restored Slate Roof
Assessing Damage: Identifying Problems in Slate Roofs
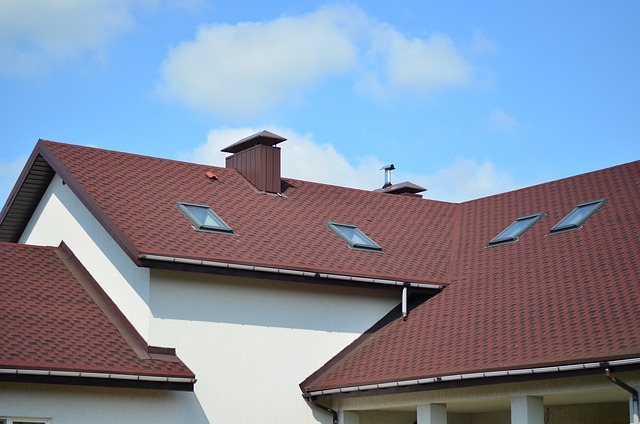
Assessing damage is a crucial step in repairing and restoring a slate roof, especially in areas like Springfield, MA, known for its historic architecture. Homeowners should regularly inspect their roofs to identify any issues early on. Common problems include missing or broken slates, damaged underlayment, loose flashing, and signs of water intrusion.
During the assessment, carefully examine each slate tile for cracks, chips, or complete disintegration. Check the underlayment for tears or moisture buildup. Look for any visible gaps in the flashing around chimneys and vents. Addressing these issues promptly is key to preventing further damage and ensuring the structural integrity of the roof, making a professional slate roof repair in Springfield MA essential.
Materials Needed for Effective Repair and Restoration
When undertaking a Slate Roof Repair in Springfield MA, rest assured, with the right materials and techniques, restoring your historic roof to its original glory is achievable. Start by gathering high-quality replacement slate tiles that match the existing shade and texture. This ensures a seamless blend that preserves the architectural integrity of your home. Additionally, you’ll need a suitable mortar for setting the slates, a brush with stiff bristles for cleaning, a hammer and nails or a specialized roofing gun, and safety gear such as gloves and goggles to protect against sharp edges. For intricate designs or damaged areas requiring precise shaping, consider acquiring specialized tools designed for slate roofing restoration.
Step-by-Step Guide to Fixing a Damaged Slate Tile
Repairing a damaged slate tile is a crucial step in maintaining and restoring the original design of your Springfield, MA slate roof. Here’s a straightforward guide to help you get started:
1. Identify the Damage: Carefully inspect your roof to pinpoint the broken or missing tiles. Look for cracks, chips, or loose patches. This process involves climbing up to your roof (ensure safety measures are in place) or assessing from ground level with a pair of binoculars.
2. Gather Materials and Tools: Before beginning repairs, gather all necessary materials and tools, including replacement slate tiles, mortar, trowels, brushes, and protective gear. It’s important to match the new tiles as closely as possible to the existing ones for aesthetic consistency. For a Springfield MA slate roof repair, consider local suppliers who can provide authentic, high-quality slate options.
3. Remove the Damaged Tile: Carefully remove the damaged tile by gently prying it up with a chisel or hammer and flat bar if necessary. Take note of its position to ensure proper replacement later.
4. Prepare the Underlayment: Clean the area where the tile was removed, removing any debris or remaining pieces of the old tile. Prepare the underlayment (the layer beneath the slate) by ensuring it’s free from moisture and in good condition.
5. Apply Mortar and Insert New Tile: Mix the mortar according to the manufacturer’s instructions and apply a thin layer to the back of the new slate tile. Position the new tile carefully at the same angle as the removed tile, pressing it firmly into place. Ensure proper alignment for an even finish.
Preserving the Original Design: Color and Texture Considerations

When repairing a slate roof in Springfield, MA, preserving the original design is paramount to maintaining the aesthetic allure and historical integrity of your property. This involves careful consideration of both color and texture. Slate comes in various natural hues, from deep grays to rich blacks, each contributing to the unique character of your roof. During repair, it’s crucial to match these colors as closely as possible to ensure a seamless blend with the existing shingles.
Texture is another vital aspect. The rough, uneven surface of slate adds to its enduring appeal. When replacing missing or damaged shingles, opt for new ones that mimic this textural quality. This ensures your repaired roof not only looks original but feels authentic, preserving the building’s overall character and enhancing its visual appeal in Springfield’s historic neighborhoods.
Final Touches: Sealing and Maintaining Your Restored Slate Roof
After completing the slate roof repair and restoration process in Springfield, MA, the final touches involve sealing and maintaining your newly restored roof. Applying a high-quality sealant to the slate shingles not only enhances their water resistance but also prolongs their lifespan. This step is crucial for protecting your roof from the elements, ensuring it remains in top condition for years to come.
Regular maintenance is key to preserving the beauty and integrity of your Springfield MA slate roof repair. This includes clearing debris, inspecting for loose or damaged slates, and reapplying sealant as needed. By implementing these simple yet effective practices, you’ll ensure your restored slate roof continues to be a striking feature, enhancing the curb appeal of your home while providing reliable protection against the ever-changing Massachusetts climate.
Restoring a slate roof to its former glory is a meticulous process that requires attention to detail, the right materials, and expert knowledge. By following the steps outlined in this guide, homeowners in Springfield, MA, can successfully repair and preserve their historic slate roofs, ensuring they stand strong against the elements while maintaining their charming aesthetic appeal. With the right care, these durable roofing systems can last for centuries, offering both structural integrity and visually stunning results.